If you are familiar with WordPress themes then you know that a lot of themes have a widgetized sidebar. This means that you can add, remove, and re-order widgets on your WordPress website by using the “widget” section of your WordPress dashboard.
Having a widgetized sidebar is very useful, but you may want to widgetize other parts of your WordPress theme as well. This is very easy to do, and once your theme is modified it will be simple for you, or the WordPress administrator, to swap widgets in and out of different parts of the website.
The first step is to add the following line of code to the part of your theme that you want to widgetize. Be sure to change “Name of Widgetized Area” to a name that makes sense for you. You will need to do this with a code editor and then upload the file via a FTP client.
<?php if ( !function_exists('dynamic_sidebar') || !dynamic_sidebar("Name of Widgetized Area") ) : ?> <?php endif;?>
In your WordPress theme folder, there should be a functions.php file. If there isn’t, just make a new file and name it “functions.php”.
In the functions.php file, add the following code:
if ( function_exists('register_sidebar') ) register_sidebar(array( 'name' => 'Name of Widgetized Area', 'before_widget' => '<div class = "widgetizedArea">', 'after_widget' => '</div>', 'before_title' => '<h3>', 'after_title' => '</h3>', ) );
The code above should be wrapped in PHP open and close(<?php and ?>, respectively) tags. If you already have a functions.php file those tags will already be there. If you created one yourself you will have to add them.
Make sure to change the name of the function (in this case it is “Name of Widgetized Area”) so that it matches the name you gave it in step 1.
The ‘before_widget’ and ‘after_widget’ parameters allow you to specify what code you would like to put before and after each widget. In this case I put a div with an class for styling purposes.
The ‘before_title’ and ‘after_title’ parameters allow you to wrap the widget titles in code. In this case I wrapped the title in <h3> and </h3> tags respectively.
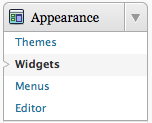
Once you have successfully added the widgetized area, you can start adding widgets to your WordPress site. To do this, log into your WordPress dashboard, then click on Widgets in the Appearance dropdown on the left side.
You should now see the “Name of Widgetized Area” section on the right side of your screen.
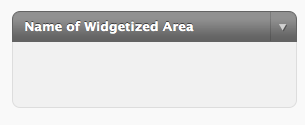
Now just click and drag widgets into the box just like your sidebar!
This is by far one of the most explicit and straight-to-the-point tutorials I’ve seen so far; it works like a charm and I din’t have to do it twice. Thanks a million Keith.
I’ve needed it to create a dynamic footer with 4 column and each column with a widget area. thanks. It helped.
Wow, thanks, this is so well explained!
Thanks for your help! Worked like a charm!
Glad I could help!
Hey keith, I have one more problem. When I enter the code in step 2 into my function.php file. it completely messes up my header area of my website. I’m using wordpress with the “geotheme” theme. your code overrides something and changes one of my widget areas (instead of creating a new widget area) that have already been custom made by “geotheme” Would you possibly have any inkling/idea on what PHP filename that Geotheme might have written their custom widgets in so that I could maybe just add a new custom area their stuff. I’m not an experienced coder, so… Read more »
Keith,
I think I might have found it. Wow they have tons of function(etc.).php files. (extreme customization!!)
Hey Andy,
No worries, you’re not a pain in the butt!
Unfortunately I am not familiar with that theme, if you are still having issues I would suggest contacting the theme developer as he or she would know more about how they organized their code.
-Keith
HI Keith,
This is very good stuff.
One question:
Where do I place the line of PHP Code from Step #1?
I created a PHP file called “make_page_widgetized.php” and saved it to my computer.
Where do I place this file….OR…..Where do I place the PHP code from within this file?
…..since I want to widgetize the content area of a “page” I am assuming that I would probably place the code into “page.php”? (If so, I wouldn’t know where in the page.php document to actually place it.
Hi Andy,
No need to create a new “make_page_widgetized.php” file, just take the line of code in step 1 and put that in your page.php file.
Hope that helps!
Keith
I really appreciate your reply Keith,
Can I place the code anywhere in the page.php file. or do I need to place it into a specific spot within the file?
Andy,
As long as you put in between the
tags it should show up. If it’s not in the correct spot then you can see where it is and move it around in your code to find the correct spot.-Keith
when i add a anchor tag it does hyperlink it but only simple text is viewed….
Would you be able to post a link so that I can look at it?
there is a little problem with this way….if a widget is created using the code you mention above you cannot use a anchor tag “<a>” to make some text hyperlink in a simple text widget if added into that area…
Hello,
I just tested this and it worked for me. What is happening when you try to add a link?
-Keith
THANK YOU sooo very much. I’m totally new to coding, but you helped me understand the code. Also doing this, I figured out something which I wanted to do for months. A BIG Thanks again.
Thanks, glad I could help!
Thanks for this code. How do I make a container so that the content isn’t from one end of the page to the next. I have it on the homepage before the loop. I’m not a coder
so your comment .. “As far as positioning, your best bet is to style the line of code in Step 1 using CSS. I would wrap the line in a div with an ID, then use the CSS id in your style sheet to add positioning elements to it” , is a little unclear to me.
Thanks for reading John. To be honest, if you are not too familiar with CSS this may be a little confusing for you.
Take the code in Step I and put “<div style = ‘width: 300px;’>” in front of it. At the end of it put “</div>”
Replace 300px with the width you would like.
Hope this helps!
Keith
Nice set of instructions. I do have a question – how do you control where the widgetized area is? I’ve gone through the steps you outlined and it appears top center(ish) and I would like it top right. Also, when it appears on the homepage (which is where I want it) the quotes don’t respect the color and justification of the text in the post – any ideas there?
Thanks for the direction this post has given me already, I’d appreciate any more help you could give. Thanks.
Hi Chris,
Thanks for reading!
As far as positioning, your best bet is to style the line of code in Step 1 using CSS. I would wrap the line in a div with an ID, then use the CSS id in your style sheet to add positioning elements to it.
I am a bit confused about what you mean with the color and justification of the text. Could you please clarify?
Thanks!
Keith
Thanks Mitch, if you decide to do it let me know if you get confused at all. I try to make my posts so that they aren’t confusing, but I can never be sure that they easy to understand.
Very interesting stuff, Keith. I’ve often thought about adding a widget to my footer, and this post will help if I do decide to do it. Thanks!